Hi Everyone!
The DT has a free week this week. Be sure to stop by their blogs to see what else they are working on individually!
We would also love to see what you are working on this week so link up your blog in the comments below!
Exciting news! We have a blog hop coming up in a couple of weeks! We are all very excited and working on some great projects for you.
On a sad note, we say good bye to DT member Darlene this week. She is leaving us to spend some more quality time with her family and to embark on some new adventures in her crafty life as well. We wish her all the best and she will be missed.
Joining our team will be our previous guest designer Jenna! We are happy to have her aboard and we know that you will love the inspiration that she creates for you~! You can check out her blog here
Have a wonderful week everyone!

Monday, May 30, 2016
Sunday, May 29, 2016
Challenge #224 Highlights
Thank you all so much for playing along with me this week for the Get Inky challenge. All the projects this week we simply awesome and it was difficult to chose just three to highlight. But, I did see three that stood out for me. This card by Billie A has the most interesting face stamp, in addition to the beautiful inky background.


I love this ink blended background panel by Tanja at Little Art Cottage. I also love that she used a pearlized water to spritz her background with texture. Nice touch.

Last, this scene by Red Obsession Cards is simply lovely. The ink blended back is lovely and the coloring on the mermaid is just awesome.

Once again, thanks to all who played along this week and congratulations to the featured 3 projects. Don't forget to grab your featured button in the right sidebar. Be sure to stop back by tomorrow to participate in the new challenge!
Monday, May 23, 2016
Challenge # 224 Get Inky
Hello All! Renee here for this weeks challenge. I am totally fascinated by all the video tutorials on the many uses of ink. Who knew they could be used for so much. From stamping, to water-coloring to all kinds of other techniques, inks are truly one of the most versatile products in our crafty arsenal. This week I challenge you to pull out your inks and give them some love. Bonus if you can use multiple inks in one project.
For my project, I tried an ink blending technique with 3 different shades of Ranger distress ink. I used Spun Sugar, Picked Raspberry and Seedless Preserves along with my mini ink blending tool to create the blended background for my planner dashboard. I then used a mini mister to splatter small droplet of water on the blended background for texture. You can head over to my blog for more details.

So, pull out your inks and join us this week as we get inky! Can't wait to see what you create.
I used RANGER Distress Ink in different colours: Fossilized Amber, Salty Ocean, Fired Brick and Archival Ink in Black.

I used Memento Tuxedo Black Ink to stamp my sentiment and Classic Ink color Blushing Bride to create the soft color to see through the die cut.

I love this kind of technique... getting INKY! I used Distress inks and a circle stencil to create this fun effect. Stop over to my blog to see all the details!

I LOVE getting inky so thought of this layout I did some time ago to
share with you when this great challenge by Renee came up! For this
piece I used Tim Holtz distress inks in various colours to create the
background with some stamped ink splatters to add texture. I used
applied some ink through an arrow stencil to add some interest in the
background.

I used Tim Holtz distress ink on this already embossed panel then popped it onto my very first acrylic card.

Amanda

I used four different Tim Holtz distress inks to create some dimension and interest and behind my photos on this layout. The inks I chose were: picked raspberry, mustard seed, spiced marmalade, and mowed lawn. I hope you will stop by my blog to read more and check out my You Tube process video that goes with this layout as well. Happy Crafting!

Julia
I used several inks on my layout, you can find the details at my blog as well as close ups of the details.

Looks like we forgot to put in the linky for everyone. If your link is in the commets, no problem! That works! :) We have extended this challenge until 4pm on Sunday May 29th and will post the highlights, later in the evening! Sorry everyone
- Tammy
I used several inks on my layout, you can find the details at my blog as well as close ups of the details.
- Tammy
Monday, May 16, 2016
Challenge #223 Heat Embossing
Hello Everyone
Shirley here this week with another challenge for you all. A few challenges back we were set the task of using an embossing folder on our creations so this time around I want to challenge you all to using "heat" embossing on your project. To demonstrate I have created a cute little card using the "Swallowtail Butterfly" stamp from Stampin' Up. I have embossed the stamp in white powder and then inked over it to make it POP!! Hope you like it :

Here's my card where I heat embossed the greeting.

After stamping onto a Vellum panel using Versamark, I embossed with a
dark green embossing powder, heat set ... then colored my image on the flip side of the vellum.


I also made a birthday card, a giftcard holder, and stamped and heat embossed the sentiment.

I used the Floating Reinker Technique and heat embossed in black.

I heat embossed the area around my journaling box in order to help tie the journaling into the rest of the layout and add some additional dimension. I even have a process video up for this on
my You Tube channel. Please come check it out!

 |

For this week's card, I am sharing a card that I made with Ken Oliver's Color Burst Powders and an embossing resist technique. Stop by my blog to see all the details!
Thank you for stopping by to see what the beautiful ladies on the Design Team have created this week to show case "heat" embossing. I can't wait to see what you create now so don't forget to add your entry below using the inlinkz.
Hugs
Shirl
Sunday, May 15, 2016
Challenge #222 Highlights
Thank you so much to all the fantastic entries we have had this week for the #222 challenge of using texture paste. You would have to agree that the Design Team also outdid themselves with this challenge with some fantastic inspiration layouts and cards!
My three top highlights are as follows;
This card from 'Plony' is lovely - love the effect of textured snow on this card
 This layout by 'Tones Scrapperom' is gorgeous! Here's a close up of the texture on the layout
 The third piece by 'Maxibelle Studio' is delightful....check this out on the blog page (the photo wouldn't copy over for some reason).
Thanks again and I look forward to seeing more inspiration next week!
The third piece by 'Maxibelle Studio' is delightful....check this out on the blog page (the photo wouldn't copy over for some reason).
Thanks again and I look forward to seeing more inspiration next week!


Monday, May 9, 2016
Challenge #222 - Use texture or modelling paste
Hello Scrappy Peeps, welcome to my first time of hosting a challenge here are Use Your Stuff. This week's challenge is about one of my favorite products to use on both cards and scrapbooking layouts - texture paste. Texture paste can also be known as modeling paste and it comes in different brands and in different consistencies, most commonly heavy bodied and light paste.
Texture paste is great for adding dimension to your layout and can be used on a variety of surfaces. Its very versatile in that you can ink directly over the dried texture paste, add paint to it when wet or paint over the dried paste. I like to apply the texture paste, usually through a stencil with a palette knife but you could use other tools to great more texture and patterns whilst the paste is wet.
This week I have a layout that I completed a little while ago using texture paste through a stencil. I then coloured over the dried texture paste with metallic gelatos.


I hope you will give this weeks challenge a go by using texture paste on your project!
I used a Tim Holtz Stencil with Matte Texture Paste for my background.


I hope you will give this weeks challenge a go by using texture paste on your project!
I used a Tim Holtz Stencil with Matte Texture Paste for my background.

This is a little close up of the texture ....

Here's my card for this challenge. I had NEVER used texture paste before. After applying it with a stencil, I painted it with shimmery watercolours.


Another fun challenge. Thanks Sarah for the great inspiration! This week I made a quick card using a stencil, embossing paste and embossing powder. I added an extra die-cut bird and some bling from my stash. Stop by my blog for all the details! I hope you will play along with us this week :)

I love adding texture to my pages, and stencils are just so much fun to play with.

I used Texture Paste, Glimmer Mist and Glimmer Glaze to create texture over a canvas decorated with a Decoupage. I have the complete tutorial in my blog if you want to see step by step this.
Renee
For this project, I used a luxe texture paste to create the gold background of my canvas. This was my first time working with texture paste and I love the results. It will definitely not be the last.

Sunday, May 8, 2016
Highlights for Challenge #221 - Sketch
Thank you to all that played along with my sketch challenge this week :) You all made wonderful creations based on the sketch and it is sooooooo hard to choose only 3 out of the 4 that linked up :) To me you all are winners :) here are
this week's highlights in no particular order.


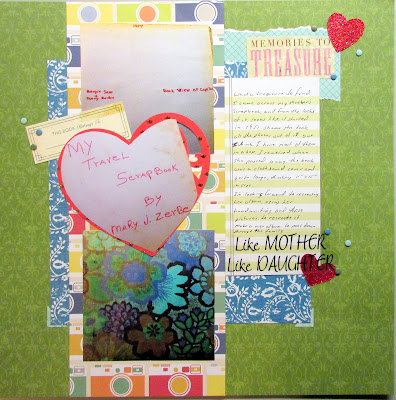
Barb I love that you drew a heart around your father and brother in the picture :) and also that your journaling came from the memorabilia that you saved.
Ma-Mi I love that you used a diary for your creation and what you did with the sketch :) I to love to journal and you created a fun way to do it in your diary
Mandy so darn cute how you used the snowflakes for the photo spots on the sketch :) Love when people can make a sketch work for them to come up with a cute layout :)
Congrats to the Top 3 and don't forget to grab your featured
button in the right sidebar. Be sure to stop back by tomorrow to participate in
the new challenge!
Monday, May 2, 2016
Challenge # 221- Sketch
Hi you all :) I'm Tina, one of the new members of the design team. I Love to use sketches so my challenge for you this week is to use this sketch:
 This is an old page maps sketch, that could translate to a card very easily for a card maker if you wanted to make a card for the challenge instead of a layout. This is what I created with the sketch:
 This layout took just over an hour to do :) with a sketch it's very easy to pull together a fantastic layout in no time :) Now to see what sweet projects my fellow DT sisters created with this sketch. For layouts and card makers too add your creation to the linky below.


Gail
I found this sketch to be a difficult challenge. But once I found the perfect photo, it came together quickly.


What an awesome sketch to create with! This week I choose to go with a layout & here is what I came up with! Yes I am still scrapping Bon Jovi concert photos from 3 years ago!!

Who says a scrapbook layout sketch can't be used on a card? LOL

Gail
I found this sketch to be a difficult challenge. But once I found the perfect photo, it came together quickly.

I chose to make a card with this sketch, too! Such a fun sketch to work with!

I had a little bit of a challenge with this layout until I selected the right pictures and then it came together pretty easily. Please visit my blog to see close-up pictures and more information. I can't wait to see what you create and how you make this sketch your own!

Wow fantastic inspiration ladies :)


I've never used a scrapbook sketch to make a card before, but this one was fun to figure out. Hope you join us! Beth
Sunday, May 1, 2016
Highlights for Challenge #220 - Use Your Scraps
Thank you to everyone who played along with our challenge this week to Use Your Scraps! We had lots of wonderful entries this week... so hard to choose just 3 :)
We loved seeing
all the fun projects that were created. Doesn't it feel great to use up those bits and pieces?
Without further delay, here are
this week's highlights in no particular order.
Pia, I love all of your layers. Super cute card!

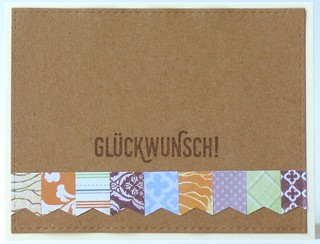
Steffii H. What a quick and fun way to use tiny bits. Very classy card!
Diane H. Such a pretty card made from leftovers. I love how it all pulled together.

Congrats to the Top 3 and don't forget to grab your featured
button in the right sidebar. Be sure to stop back by tomorrow to participate in
the new challenge!
Subscribe to:
Posts (Atom)